How to wire a 2g 4g63 engine
From HotrodWiki
4G63 wiring for an engine swap (2G Style)
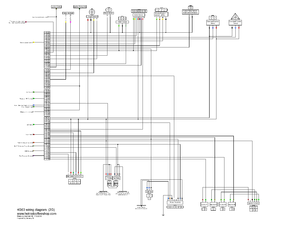
- 1995-99 2G DSM 4G63 engine swap wiring schematic diagram (seen in image)
4G63 MPI Relay (Connector B-87)
- The MPI relay distributes power to the 4G63 engine. If you wire it wrong, you will have problems like your fuel pump not turning on, ECU not powering up properly, etc.
- Unplug the MPI connector from the MPI relay and look straight into the pins at the end of the wiring connector. Wires away from you. Make sure the clip that locks the connector into the MPI relay is facing up.
The order of pins are:
- 12
- 34
- Pin 1 - Red Wire - This wire spiderwebs through the harness and goes to Pin 12 & Pin 25 at the ECU. It is also connected to:
- Idle Speed Control Motor (Pin 2 & Pin 5)
- Oxygen Sensor (Pin 1)
- Mass Airflow Sensor (Pin 4)
- Camshaft Position Sensor (Pin 3)
- Crankshaft Position Sensor (Pin 3)
- Injector Resistor (Pin 3)
- Pin 2 - Light Green Wire - This is a direct wire to Pin 38 at the ECU.
- Pin 3 - Blue Wire - This can be combined with MPI Pin 4 and connected to a 20A Fuse. The other side of this fuse should connect to the battery, giving it power all the time.
- Pin 4 - Blue Wire - This can be combined with MPI Pin 3 and connected to a 20A Fuse. The other side of this fuse should connect to the battery, giving it power all the time.
More coming soon...
